Thursday, October 4, 2012


Welcome to the Autumn Colours Blog Hop with Two Scrapbook Friends!  You should have arrived here from Jayne's blog.

For my project I HAD to use my new Silhouette and I created this standing card.
 
There is a card that comes out of the middle. The message is written on the backside so as not to interfere with the cut out on the front.
I added a quote and some small embellishments but left room to write a personal message.


Don't forget - in order to be entered to win a prize:
1. Leave a comment on all the blogs as you go and then go back to the Two Scrapbook Friends blog and leave a final comment there by October 8th at midnight..
2. To have a second chance to win, keep track of the HIGHLIGHTED WORDS from each blog and email the phrase to 2friends@execulink.com. Put "Blog Contest" in your subject line.
3. Check back at the Two Scrapbook Friends blog on October 10th to see if you are the winner. (Winners will not be contacted personally.)

Be sure to stop by each on the following blogs, leave a comment and keep track of the secret word!

Joanne
Two Scrapbook Friends

Hope you have had fun hopping around and Happy Fall Y'All!


Wednesday, July 11, 2012

And this is why I haven't been scrapbooking....

At the beginning of June my Mother-in-law asked if I would create a scrapbook for her church's priest who was leaving after 6 years. I said yes even though I KNEW it would be a big job AND that it had to be done by June 26th. I did manage to accomplish this project with a few hours to spare but this is what my room looks like now:

I think my desk is somewhere under there??? SO I might be on a bit of a hiatus til this disaster gets organized.  Is it me or does Holden look like he just might be swallowed up by a tidal wave of scrap supplies???? RUN!!!!

Anyhow I do hope you are finding some scrappy time over the summer and that you are enjoying the heat wave that makes me want the a/c fixer guy to show up NOW!!

Thursday, June 7, 2012

Welcome to the Two Scrapbook Friends Father's Day Blog Hop! You should have started the hop at the Two Scrapbook Friends Blog and arrived here from Christa's blog. If you comment on each blog, you will qualify to be in a draw for a special prize from Two Scrapbook Friends! Also, you will find a RED HIGHLIGHTED word on each blog which will make a phrase at the end of the Blog Hop! Once you have completed the hop to all our designers blogs, please leave a comment on the Two Scrapbook Friends blog. Then be sure to email the completed phrase to them for a second chance to win! So remember, in order to be entered to win: 1. Leave a comment on all the blogs as you go and then come back to the Two Scrapbook Friends blog and leave a final comment there. 2. To have a second chance to win, keep track of the HIGHLIGHTED WORDS from each blog and email the phrase to 2friends@execulink.com. Put "Blog Contest" in your subject line. 3. Check back at the Two Scrapbook Friends blog on June 12th to see if you are the winner. (Winners will not be contacted personally.) Here is the list of blogs you will visit on this inspiring journey:
Joanne

For my project I chose to scrap a few sepia pics of my husband and youngest son at the Wiarton Fair a few years ago. Holden was having a riot feeding Daddy popcorn. I used some great papers from Echo Park's This & That collection as well as a few odds and ends from my stash. My title came to me as I was staring at the ruler paper and thought it was perfect for the love they have for eachother.

I used Mr. Huey's white mist (you NEED to add this to your supplies!), some dew drops, twine and my trusty Dymo Label Maker (you need one of those too!) for the date on kraft core.

Thanks so much for hopping by and now you can skip on over to Jan's blog where you can see what she has created.

Friday, May 18, 2012

This week's Friendzy Friday is all about something I fell in love with at our Spring Retreat. Some of you may already be sharing this love but for those of you who haven't seen the demos at Scrapfest or at the store you may soon find yourself falling in love too!

I would like to introduce you to Kraft Core cardstock. We have carried the Co-ordinations line of cardstock for a long time, you know, the one with the colour core? Well this is from the same company who have collaborated with that super crafty guy, Tim Holtz. They came up with a line of beautiful colours that have a KRAFT core. This means that when you sand, tear, emboss etc you get the kraft showing through under the colour surface.

The colours are beautiful and rich so of course you can use the cardstock the same way you would use any cardstock but the beauty of it really shows when you start to play with all the techniques.

You can tear it:

You can emboss it (using a Cuttlebug):

You can sand it:


And here comes my favourite thing to do: Use a dymo labeller to make captions/journalling strips for layouts!!

You cut the paper into 3/8 strips and feed it through where the tape would go, click your letters, sand and voila! This makes me so happy as I am not a fan of my handwriting and this is much quicker than going to the computer. Plus, I love the distressed feel. The 'ooooohs' and 'aaaaaahs' at the retreat and Scrapfest were hilarious, as if the wheel had been rediscovered! Just an F.Y.I. the dymo comes with 3 wheels, black adhesive tape and a great little bag to carry it all in.

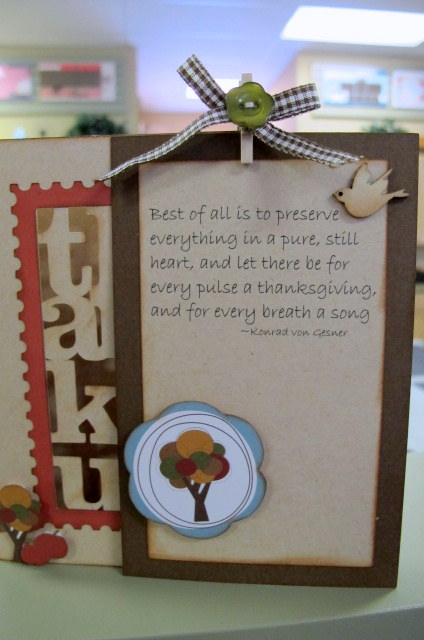
Here is a layout you may have seen at the store that I used it on:


Kraft core cardstock is available by the sheet in all 24 wonderful colours or in 3 different pads:
A 12x12 pad that gives you 1 of each colour

A 4.25x5.5 pad with 3 of each colour

Or a 2.25x12 pad that also gives you 3 of each colour.
 This pad is ideal for borders and of course for creating strips with your Dymo!

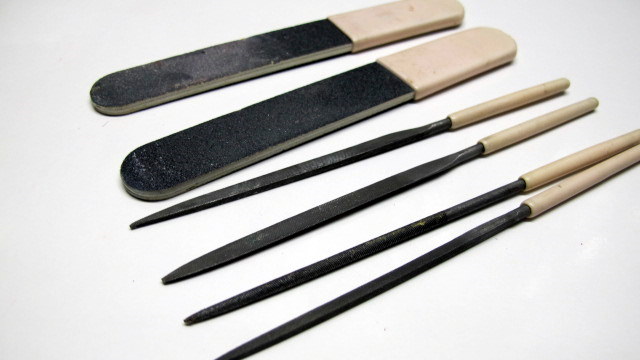
 Another handy little tool for all this sanding is the Tim Holtz sanding tool.
It is super easy to hold on to and the sand paper is simple to replace.

SO that is my new love and I think we will have a long lasting relationship.

 I have highlighted direct links to the store so you can get you hands on some of these goodies. I also know that an order of these fab products are due any day in the store (might be here already!)

Friday, April 27, 2012

Online Crop : April 27- May 6 2012

In honour of National Scrapbook Day, May 5th, the TSF design team is hosting an online crop. Each of the ladies, along with Joanne and Carolyn, have issued a technique-based challenge to encourage you to try something new or maybe to revisit something you haven't done in awhile. My challenge may be distressing to those who like everything neat and tidy however you will need to get out those files and inks cause it's time to DISTRESS! I have always loved the look of distressing on layouts and cards, I love the texture it gives. I pulled out my arsenal of distress tools and went to town on this layout featuring My Mind's Eye's Miss. Caroline collection:
I started with a distressed wood pattern paper which make fantastic backgrounds!
The idea to literally rip holes in my paper came to me as I was looking at the layout. I had all the pennants and photo adhered already but wanted to add something more. I took out a file with a pointy end and just started notching out the paper. I rolled it back, inked it then added a small piece of paper underneath.
I used some old Heidi Grace chipboard letters
that were totally the wrong colour so I sanded off the top and used a marker to add the right colour.
I used a distressing tool to rough up the edges
I even used a file on the edge of my photo, one of my favourite distressing techniques!

I hope you willl join in on my challenge and distress a layout or card!!
1) Projects MUST appear in the correct section of the GALLERY and FORUM to be eligible
2) You can only use ONE project to satisfy ONE challenge
3) Projects MUST be newly created to qualify for winning goodies!

Friday, April 13, 2012

April 13 Friendzy Friday-Microbeads

Recently TSF received a shipment of microbeads from American Crafts. I was intrigued by these teeny, tiny beads and wondered what you could do with them.

They come in a wide array of bright colours and some neutrals.


I had taken a shaker card class designed by Joanne and we used some beads as filler for the cards


but I thought there has to be a use for these in scrapbooking too as I am not a prolific card maker. So here is what I came up with. You will need liquid glue, glue dots or a Xyron sticker maker (which I do not have any longer as my boys have adopted it) and some sort of tray to catch the beads. Embossing trays work well.


After getting these supplies together I started looking at my stash to see what could be embellished with these wee little beads. Diecuts, plain chipboard, adhesive chipboard you don't like anymore but have sticky backs etc are all fair game.
Glue dots allow you to add polka dot beads anywhere you like

A liquid adhesive, like 3n1, allows the beads to stay pliable
and you can squish them into small spaces
Any self-adhesive shapes work great. Just flip them over and sprinkle with beads

Add beads to trees and as butterfly bodies


What I discovered is these beads are tons of fun to add some texture to just about anything. I started with blue and green but think how pretty the silver ones would be on snow layouts or the bright red ones on balloon diecuts. The options are truly endless.
These beads are in stock now!

Wednesday, April 11, 2012

Sketch Challenge April 11

Here I am again with another sketch designed by me. I chose a summer layout to turn into a sketch as I am not very happy with that bit of white stuff that was flying around yesterday!

So here is my simple pencil sketch enhanced using Picasa and Picnik (both FREE Google programs that I will be telling you all about in a 3 part series in June!)

Here is the layout my sketch is derived from.


I hope you enjoy playing along and encourage you to upload your creations to the TSF gallery.

Monday, April 2, 2012


Have you noticed all the buds on the trees? This is my favourite time of year when everything is just about to burst out into green so this week's Scrappy Challenge is to use a tree on a card or layout. I have used trees many, many times and this past weekend at the retreat I created another one of my boys climbing a tree in Waterloo Park.


The tree paper and diecut tree are from Kaisercraft.

I stitched around the tree top and added a few dew drops.

I hope you can find the time to participate in the challenge and don't forget to upload it to the TSF gallery

Wednesday, March 28, 2012

Sketch Challenge - March 28

For this week's sketch challenge I thought I would give you a little Easter inspiration but of course you can use the sketch for whatever theme you like!
I decided to try a hybrid sketch which means I drew it by hand then scanned it and tweaked it using Picasa and Picnik.

Here is what I came up with:


And here is my layout...


So what do you think?
I hope you will play along on our forum and show me your take on the sketch!

Friday, March 9, 2012

Friendzy Friday March 9 - Files


For this week's Friendzy Friday instead of showing you how to make something or a cool new technique I have decided to focus on one of my favourite tools in my scrap bag. The Basic Grey Precision File Set is something I think all scrappers should have on their desk. This little tube of different sized files can make distressing easy and covering chipboard a simple task. I have had these as part of my basic tool kit for a couple of years and I reach for all the time (as you can tell by how worn they are!)

The set comes with two flat, double sided boards and 4 metal files : flat, round, half round and knife point. The rubber grips make them so easy to handle.

The flat boards work really for distressing the edges of paper or even just to remove that fluffy edge that shows up sometimes when you trim your paper.

It can be a challenge to cover chipboard/wood shapes and letters and get a clean finish when using paper. These files make it a breeze. I have had this wooden sign of my son's name for ages and thought now would be a great time to cover it. You can see it has lots of intricate edges, perfect to test out the files.

The round file is IDEAL for smoothing out the hollows in O's, P's etc. I find that if you spin the file as you work you get a cleaner finish.

Another tip is to always pull from behind when filing so the smooth edge is visible.

The knife edge works well to get in narrow spots.

No need to worry about rough, uneven spots. The files are metal so without too much effort it just smoothes right away:

Nice, clean edges all around!

I have even used the round file to drill small holes.

Here's the finished project!

These files will make a very useful addition to your toolkit!

(p.s. TSF is currently out of these files but they are ordered and will be in very soon!)

Monday, February 27, 2012

Scrappy Challenge: Feb 27- Use Packaging

Have you ever looked at the packages your pretty embellishments come in and wondered 'wow, that's nice too, I could use that on my layout'. If you haven't you are missing out and this week I challenge you to use packaging on a layout or card. Many manufactuers' packaging is almost as nice as what's inside. I was at a crop a few weeks ago and I was scavenging my neighbours' croppin' cuties...here is what I came up with:

First thing I snatched was the jillibean package. I loved the kraft colour and that big flower. I saw the BoBunny pieces and thought they would make great photo mats and they already have a scalloped edge! Even though I loved the kraft flower I ended up covering it as I wanted to make the flower really fun and bright. I trimmed down the photos to fit perfectly on the mats.

Here are a couple of older layouts using packaging too. This layout was actually created on a cardboard box we received stock in at the store. It was inspired by one of the Prima layouts from CHA. The white doilies were the acrylic packaging that their crocheted flowers came in.

This layout also uses Prima packaging (it's always SO pretty). The green piece along the bottom with the kraft vines was the backing for the felt stem you see on the layout.

So before you throw out those embellishment packages let's see you use 'em up! Make sure to add your creation into our gallery and under the sketch challenge heading in our forum.

Can't wait to see how you repurpose!